

Project: Automatic Doorbell
Automatic doorbell

Let’s see in the below projects how an IR sensor works.
Component Required :
The components required for this project are:
Power block – 1
IR sensor block – 1
NOT gate Block – 1
Buzzer Block – 1
Gray Plate – 1
Power bank – 1
USB to DC jack – 1
CT2 – 8
Circuit Connection :
Let’s make the circuit for this project:
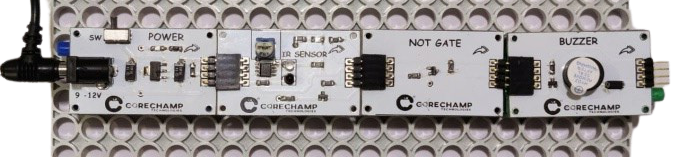
First, take a power block.
Join an IR sensor block to it.
Add a NOT gate block and last add a Buzzer block.
Attach 8 CT2 connectors at the bottom of the blocks and mount them on the Gray plate as shown in the figure.
Turn the power supply ON.
Now when you place the hand in front of the IR sensor block, the IR sensor block will get activated and send a signal to the buzzer to buzz. Now our IR sensor is an actively HIGH type of sensor, i.e., the Buzzer will stay ON when the sensor is OFF and it will turn OFF when the Sensor is ON. To reverse this form of output we have used a NOT gate as well in the circuit.
Hence when we place a hand in front of the IR sensor, the Buzzer will start buzzing, indicating a visitor at the Door.